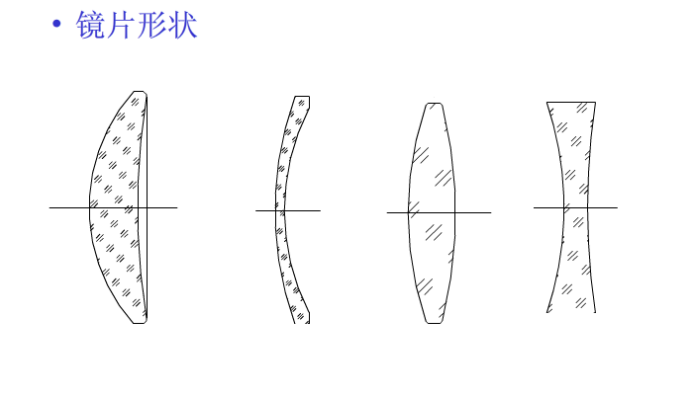
Optical Lens Types
Double convex
One convex and one concave
One convex and one flat
Double concave
One concave and one flat (as shown in the figure)
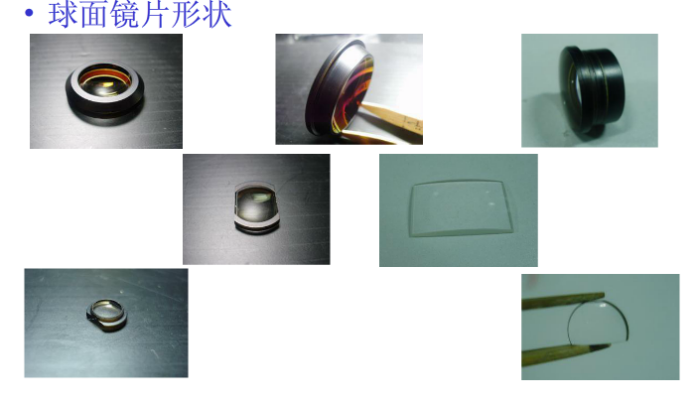
Classification of Optical Lenses
Glasses with similar chemical composition and optical properties are also distributed in adjacent positions on the Abbe diagram. The Abbe diagram of Schott Glass Factory has a set of straight lines and curves, which divide the Abbe diagram into many areas and classify optical glasses; for example, crown glasses K5, K7, and K10 are in the K area, and flint glasses F2, F4, and F5 are in the F area. Symbols in glass names: F stands for flint K stands for crown B stands for boron BA stands for barium LA stands for lanthanum N stands for lead-free P stands for phosphorus.
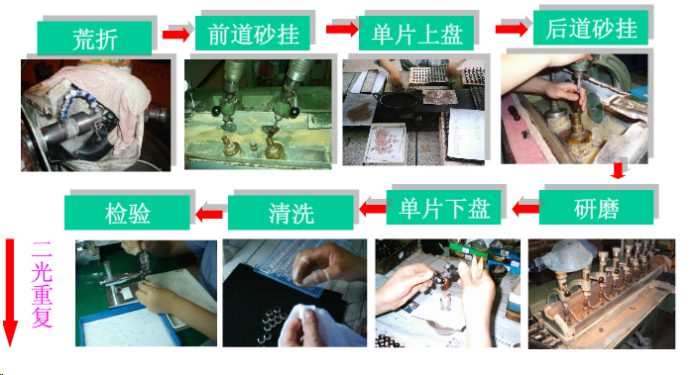
Optical Cold Processing Procedures
milling → fine grinding → polishing → cleaning → edge grinding → coating → ink coating → gluing
Milling (barren folding/ball milling/rough grinding): The first step of lens grinding is to remove uneven bubbles and impurities on the lens surface (about 0.05-0.08mm), which plays a shaping role. As shown below:
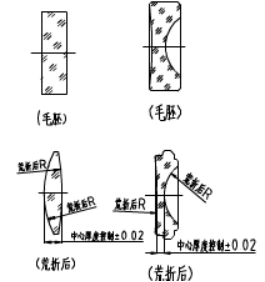
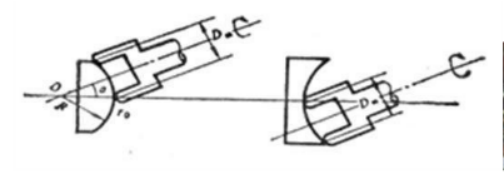
Principle: As shown in the figure above, the cutting edge of the diamond grinding wheel passes through the vertex of the lens. The axis of the grinding wheel and the axis of the lens intersect at point 0. The axis of the grinding tool rotates around its own axis at high speed, and the lens rotates around its own axis at low speed. The envelope of the motion trajectory forms a spherical surface.
Abandoned folding processing equipment: QM0.
8A, manufacturer: Korea Times, no chamfering function, relatively low accuracy.
CG2.0, manufacturer: Korea Guangjin, has chamfering function and relatively high accuracy.
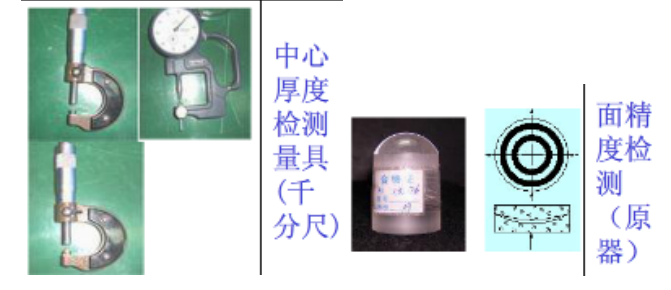
Measuring tools: center thickness detection measuring tool (micrometer)
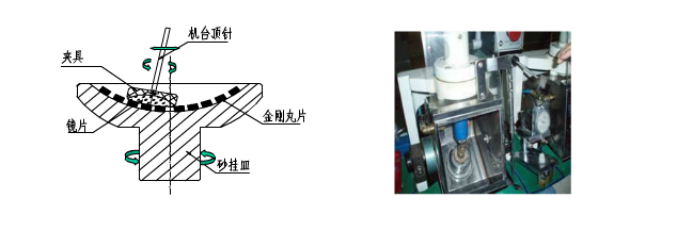
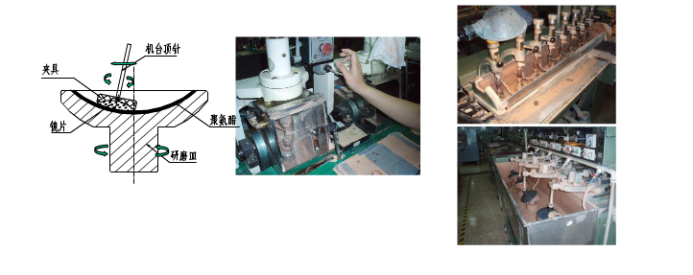
2. Fine grinding (sand hanging): eliminate the damaged layer of the milled lens, reduce the concave and convex layer on the lens surface, and fix the R value (aperture, Newton ring)
Principle: The lens is in the sand hanging dish (made of diamond pellets selected according to the material), the sand hanging dish rotates at high speed along its own axis, and the lens rotates at high speed along its own axis and swings back and forth, as shown in the figure below. The diamond pellets grind the lens surface, thereby reducing the depth of the concave and convex layer on the lens surface, and further improving the accuracy of the curvature radius or flatness of the lens surface.
Process: Material collection → First sanding on one side → Second sanding on one side → First sanding on the second side → Second sanding on the second side → Sanding inspection → Flow into grinding
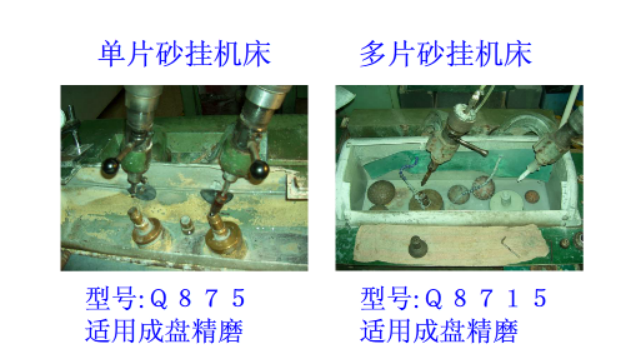
Sanding equipment: Small spherical single-piece sanding equipment; Large spherical single-piece sanding equipment. (As shown below)
Testing tools: center thickness testing gauge (micrometer); surface accuracy testing (original), as shown below:
The single-piece spring plate process (fine grinding) is shown below:
The multi-plate process (fine grinding) is shown below:
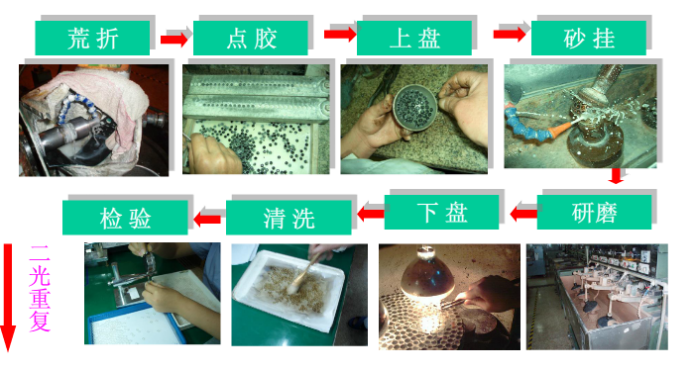
3. Polishing (grinding): Polish the finely ground lens once. This process is mainly to make the appearance better. Note: Some customers do two polishings, the first one is rough polishing and the second one is fine polishing. Most customers in the market only need one process.
4. Cleaning: Clean the polishing powder and residue on the surface of the polished lens to prevent agglomeration.
5. Edge grinding: Grind the original lens outer diameter to the specified outer diameter.
6. Coating: Coat the surface of the lens that needs to be coated with one or more layers of colored film or other film.
7. Inking: Coat the outer edge of the lens that needs to be coated with a layer of black ink to prevent reflection.
8. Gluing: Use glue to combine two lenses with opposite R values and the same outer diameter material. Special process: multi-piece processing (disc processing) and small spherical surface processing (20-axis equipment) wire cutting. Depending on the different production processes, the processes may vary slightly, such as the order of inking and gluing.
Special Processes in Lens Production
Scope of application: lenses with edge thickness less than 0.3mm after grinding
Purpose: 1. Increase edge thickness after grinding and reduce edge damage during grinding;
2. Improve aperture stability during grinding
Scope of application: lenses that must be cored after gluing due to special requirements of the customer. If the customer does not specify, this process will not be arranged
Purpose: 1. Completely remove excess glue on the edge of the lens
2. There will be no bright lines after blackening (inking)
The lens diameter is large (>¢20mm) and the margin for trimming is large (>3mm), and the edges can be trimmed after folding;
The lens diameter is small (<¢20mm), the trimming margin is large (>3mm), and the edge is trimmed after taking out the core;
The lens diameter is small (<¢20mm), the trimming margin is small (<3mm), and the core and trimming can be completed in one go.
Abrasive Materials and Grinding Process
Abrasive Powder Types
Grinding Fluid Characteristics
Grinding Leather Specifications
pH Value of Grinding Fluid
Quality Requirements for Grinding Processing
Sand
Causes | Overcoming Methods |
1. The roughened surface is rough, the amount of sand cutting is insufficient, and the remaining damaged layer of the roughened surface is not completely cut away, resulting in grinding that cannot be eliminated. | 1. Strictly control the quality of waste and sand hanging. The damaged layer in the previous process must be completely eliminated before it can be transferred to grinding. |
2. The sand hanging aperture is too positive or too negative, resulting in the edge or center not being ground when the grinding time is up. | 2. The sand surface shape accuracy is strictly controlled within the specification range. |
3. The grinding tightness is inconsistent and some parts are not ground enough. | 3. Repair the grinding dish or replace it with a new one to keep the surface shape of the dish consistent. |
4. The grinding dish is passivated (the surface is too smooth), the grinding fluid concentration is too low or it has been used for too long, resulting in a decrease in its grinding ability. | 4. Use a toothbrush or a soft copper brush to lightly brush the surface of the grinding dish, then use a repair dish to repair the LAP (calibration), add new grinding powder, and adjust the concentration of the grinding fluid. |
5. The swing amplitude is too small or the eccentric position is too close to the center, resulting in insufficient grinding force | 5. Adjust the swing amplitude and offset position to allow the upper jig and the upper-upper jig to rotate flexibly. |
6. Insufficient grinding time or improper selection of abrasives | 6. Reset the grinding time and select new grinding powder |
7. The pressure is too light or the skewer does not act on the upper fixture | 7. Adjust the position and pressure of the string rod so that the lens can be ground normally |
8. The grinding area of the lens is large and the grinding fluid cannot enter the grinding center. | 8. Make the groove for grinding leather as wide as possible, and make sure the supply of grinding liquid is sufficient. |
9. The paper pad of the fixture is too low, and the lens does not show the white plastic steel | 9. Low-profile white plastic steel or thick padding paper |
10. The speed is too low | 10. Increase the speed |
2. Scars
Causes | Overcoming Methods |
1. The sand hanging time is short, the broken damaged layer has not been worn away or the scars caused by sand hanging have not been eliminated by grinding. | 1. Strictly control the quality of sand hanging and find out the reasons why sand hanging causes scratches. |
2. The grinding dish does not fit well with the lens, and the grinding tightness is inconsistent. | 2. Adjust the surface shape of the grinding dish so that the lens and the grinding dish have a good fit and the tightness is consistent during grinding. |
3. The grinding dish or grinding fluid is not cleaned properly and contains impurities. | 3. Brush the grinding dish and clean the grinding machine table frequently. The grinding liquid should be well filtered to prevent dirt from entering the grinding liquid. |
4. When checking the aperture with the original instrument, the method is improper (pushing hard or not wiping off the dust, etc.) | 4. When checking the aperture with the original device, first wipe the surface of the original device and the lens clean, and press them gently. If optical glue or unclear interference occurs, the surface should be cleaned again. Do not push or pull hard. |
5. Dangerous actions when picking up and placing lenses | 5. Follow the guidelines when picking up, inserting, transporting and storing lenses |
6. The wrong grinding powder is used for soft lenses | 6. Choose the corresponding soft material of abrasive leather and abrasive powder, and wipe the lens with a degreased soft cloth or cleaning paper. |
7. The grinding leather is broken and the lens is scratched or the grinding dish basically exposes the scratched lens. | 7. If the grinding leather is used for too long or is damaged, it should be replaced in time. |
8. The process is backlogged, first process the surface grinding powder to dry up and then grind it. | 8. Wipe the processed surface clean before inserting it into a basket or plate. |
9. The basket is not selected correctly or the lens is inserted in the wrong direction | 9. Reproduce basket adjustment or reverse |
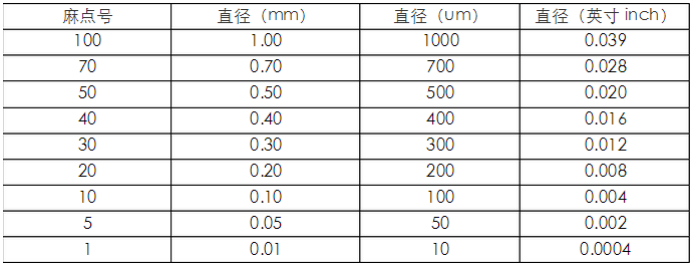
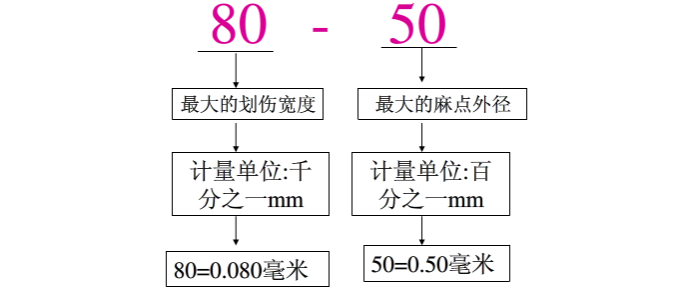
The scratch and pit inspection level is given by two codes, such as: 10-5, 20-10, 80-50. The first code is the scratch number, which gives the maximum scratch width, as shown in the table below.

The second digit is the pit number, and it gives the maximum pit diameter, as shown in the table:
Appearance: American standard analysis
 English
 العربية
 Français
 Русский
 Español
 Português
 Deutsch
 italiano
 日本語
日本語 한국어
한국어 Nederlands
 Tiếng Việt
 ไทย
ไทย Polski
 Türkçe
 አማርኛ
አማርኛ ພາສາລາວ
 ភាសាខ្មែរ
 Bahasa Melayu
 ဗမာစာ
ဗမာစာ தமிழ்
தமிழ் Filipino
 Bahasa Indonesia
 magyar
 Română
 Čeština
 Монгол
 қазақ
қазақ Српски
 हिन्दी
 فارسی
فارسی Kiswahili
 Slovenčina
 Slovenščina
 Norsk
Norsk Svenska
 українська
 Ελληνικά
 Suomi
Suomi Հայերեն
 עברית
עברית Latine
 Dansk
Dansk اردو
اردو Shqip
Shqip বাংলা
বাংলা Hrvatski
 Afrikaans
 Gaeilge
 Eesti keel
 Māori
Māori


